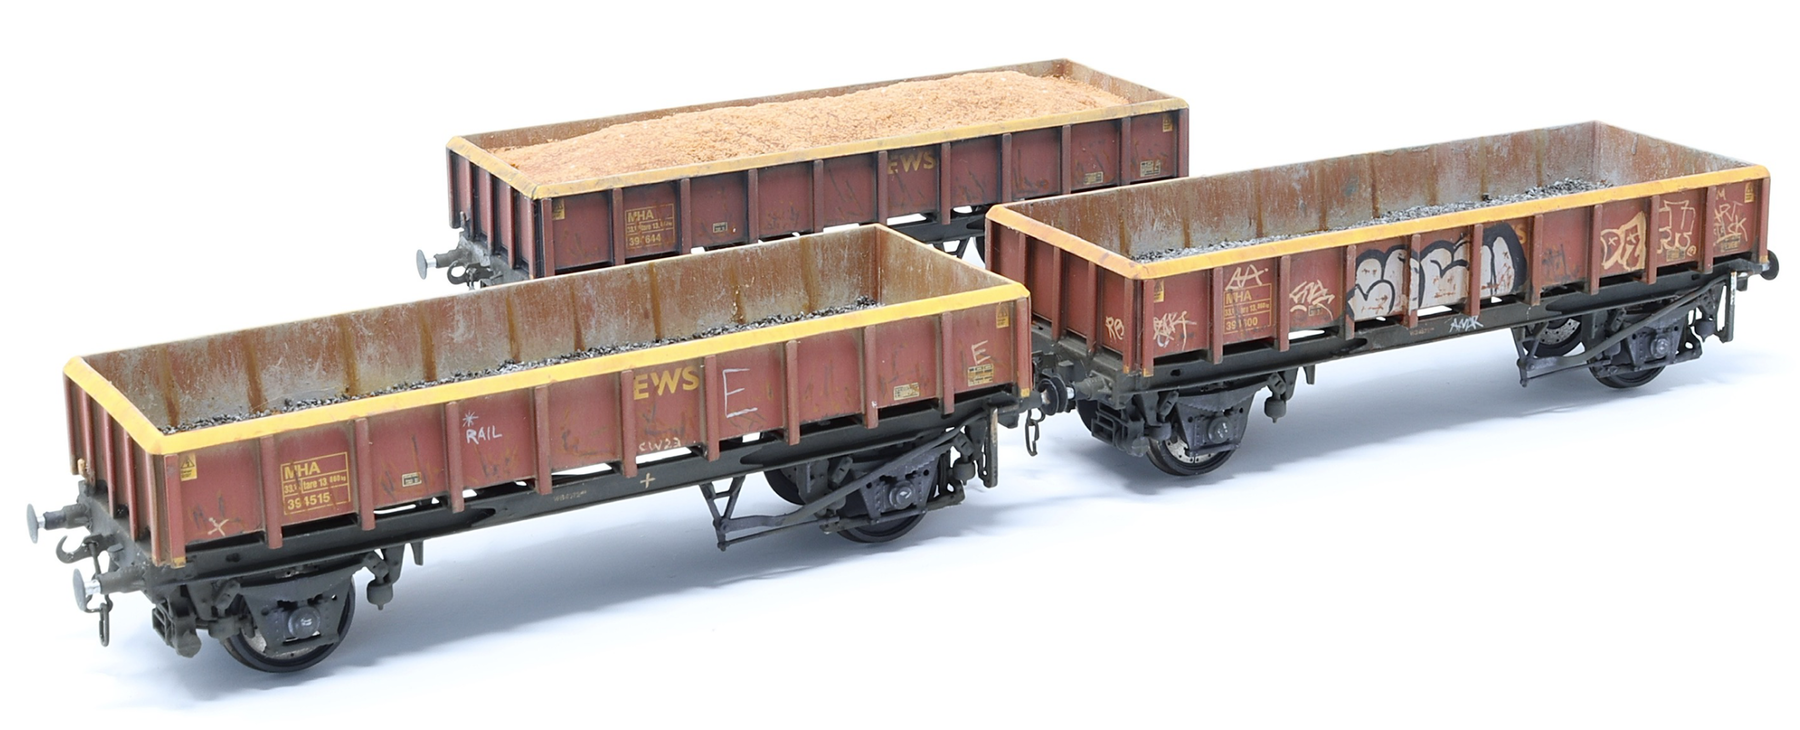
Let's Get Involved - Accurascale MHA ‘Coalfish’ wagons by James Makin
Let's Get Involved" is back! Today we have a weathering guide of our latest HMA Coalfish wagons by James Makin. But that's not all, James also shows you how to make your own loads and add graffitti too!
Fancy some of your own? Click here to order!
In the meantime, scroll down and be inspired! Take it away, James!
Built on the chassis of redundant ‘Merry-go-round’ (MGR) coal hoppers in the early 2000s, the rugged new box-body would give the wagons a second lease of life as ballast, spoil and sand carriers for a variety of engineering roles across the UK network for the next 15-20 years.
Re-coded as MHA and given a suitable engineering wagon nickname ‘Coalfish’ – two variants of box bodies were produced, the second of which is the subject of the Accurascale model here and introduced to the network from 2002.
After just a short period in service, the wagons started to take on a distinctly weathered appearance, both inside and out, so here’s a quick step-by-step weathering guide to how you can make your Accurascale MHA wagons more personalised.
Prototype inspiration
Before getting started, it’s highly recommended to browse photographs of the real wagons to get a feel for how they weather, and pick out some examples that you would like to replicate in miniature. Online photograph searches for MHA wagons on Flickr, Smugmug and Google Images reveal stacks of useful prototype inspiration from the past twenty years of service.
Getting started on the exterior
Step 1

The first stage is to apply a coat of matt varnish to the wagons, ensuring even coverage of the bodysides, ends and rib sections, possibly the interior too. This will aid weathering later as it gives a matt surface in which weathering colours will ‘cling’ to, better than the smooth satin factory finish as supplied. There are many different varieties of matt varnish available, here the wagons were coated with Railmatch Matt Varnish, available in aerosol format for convenience.
Step 2

Having allowed the matt varnish layer to cure and harden for several weeks, work can then start on applying paint effects to the wagons to portray an MHA that’s been in service for several years, with ingrained dirt and deposits left in the sheltered areas around the ribs.
A layer of Humbrol brown enamel paint is applied to kickstart this process – in this case Humbrol No. 62 Matt Leather, which is quite a light, bright orangey shade, however your chosen prototype wagon may have a darker appearance in which you may wish to choose a darker shade accordingly. This paint is applied liberally to the sides and ends of the wagon body.
Step 3

Whilst the paint is still wet, the majority of the brown can then be removed using a cotton bud, wiping it off downwards in a vertical motion. The bright EWS red of the wagon will now be tinted towards a more brown, muted, workstained appearance, with an initial layer of brown gathering around the hard-to-reach areas at each rib. The wagon is left to dry thoroughly for a few days.
Step 4

Whilst the first coat of brown will already have started to work it’s magic on dulling the bright paintwork, it comes alive when subsequent coats of other colours are applied on top. Here, a coat of darker brown is added, Humbrol’s No. 113, 119, 251 or dark grey No. 32 can all be very useful shades here. As before, simply apply the neat enamel paint liberally over the wagon body, taking care to get into every nook and cranny of the ribs.
Step 5

This paint can then be removed, as before, with a soft cotton bud, taking care to work downwards vertically all the time, which simulates how dirt is washed away with rainwater in real life, leaving the dirt in the sheltered areas around the ribs. By removing less paint in certain areas, you can also replicate the effect of some streaking where it occurs too.
Although this may seem a repetitive task, adding these extra shades of paint will enhance the depth of the weathered finish on the model, as the varying layers of brown and grey can be glimpsed through each other. The wagons featured here have had 2-3 different shades applied, matched by eye to prototype photographs, and it’s worth looking closely at pictures as not all examples of MHAs have weathered in exactly the same way.
Starting on the Interior
Step 6

The MHA wagon models are supplied with a mid-brown finish, which gives a good background colour onto which further paint shades can be applied to enhance the realistic appearance of the wagon interior. Based on examining many prototype photographs, a range of enamel paints were chosen, generally sandy, earthy grey and light brown colours, which are the result of the prototype typically being utilised to carry loads of sand, dirt, spoil and fresh ballast for engineering projects.
Step 7

The next stages of weathering the wagon interior involve drybrushing. This is where a paintbrush is dipped into paint but most is wiped away using a kitchen towel to leave just a small deposit on the hairs of the paintbrush, which helps to give a slightly scratchy appearance to each brush stroke.
Using a medium-size brush, earthy brown colours are drybrushed into the corners of the wagon interior, between the floor and the walls. Upward strokes are made to bring the earthy colours up the side of the wagon to create intense streaking in the corner sections and the walls.
Step 8

Lighter shades of paint are then drybrushed on over the top, again building up the range of shades to boost the depth of the weathering. The greeny-brown shades are overlaid with light and mid grey shades, also working into the flat floor of the wagon, using a combination of drybrushing streaks from one side to another, and stippling, by pressing the brush hairs end-on downward into the floor of the wagon. Be sure to have an older, or cheap unwanted paintbrush handy for this task, as it can bend the hairs of your brush!
Step 9

Keep experimenting and adding further shades of earthy colours to the wagon interior until you are happy. The key part to remember is that there is no right or wrong here, with so much variation to be observed in the prototype, it’s important to work from a real-life photograph and build up the shades to match exactly what you see. There’s also the option at this stage to add darker staining from rainwater – which can collect and form puddles within open wagons.
Step 10

Flicking back to the wagon exterior briefly – whilst you have the earthy paints out, you may wish to drybrush some of the shades down the outside of the wagon. Some examples of MHAs have been seen with a distinctly dusty finish from where they have been working with ballast or sand, so you can work the large dry brush vertically down the side of the wagon body, highlighting the raised detail in the process.
Step 11

After these stages, this should give you a very varied wagon interior, with a wide range of colour tones and marks inside, really breaking up the base brown from the factory-supplied wagons.
The next stage of the project is recreating the distinctive markings on the interior that equate with the positioning of the structural ribs on the outside the wagon body. On the prototype, the thin sides of the wagon plating can bend and flex around the thick strengthening ribs, with the end result being that the rib areas appear darker and taking the brunt of the load compared to the rest of the inside of the wagon interior. The flooring also bends and rainwater puddles can frequently be seen between the ribs too.
Step 12

To recreate this weathering effect, the areas where the ribs are on the outside of the body, are carefully painted onto the interior of the wagon. Starting with an earthy colour of Humbrol 119, light passes of the brush build up the colour, being careful to get the ribs in the matching places to the external ribs. The colour is then built up using darker shades of brown such as Humbrol 62 and 186, as required, going from light to dark.
Step 13

The interiors can now be regarded as complete, and ready for a load to be added, if desired.
Personalising your models: graffiti & markings
Step 14

With a wagon such as the MHA, it didn’t take long before they started to receive attention from local graffiti ‘artists’. Like it or loathe it, it’s an interesting detail that exists to be modelled, so here is a little guide on how a few simple bespoke artworks can be created without having to resort to fiddly or generic decals. The basic wagon side here is ready for application of a two-colour graffiti mural that was spotted on a wagon photograph on Flickr.
Step 15

Realism and believability is key when it comes to graffiti – try and find a ‘tag’ or mural that is on the same prototype as you are modelling for authenticity and to judge the right place on where the graffiti would normally sit. A light grey background colour was painted on, paying close attention to the prototype pictures to get both the proportions and positioning just right.
Step 16

Once the light grey base was dry, the black lining was added over the top, using a super fine 5/0 paintbrush for the job, a steady hand, and free-flowing Humbrol 33 matt black. The quality paintbrush is essential to getting a good finish here – it is key to have a brush head that ends in a fine point. Any frayed brush hairs can be carefully removed with tweezers.
Step 17

The finished ‘artwork’ can be seen here, it’s a case of constantly checking back between the model and the original graffiti photograph to check that everything is in the right place and has been recreated in proportion. The benefit of painting your own graffiti is that it is unique and much cheaper to do than aftermarket decals, which can be both challenging to apply, and make all wagons look the same.
Dents & Scratches
Step 18

The outside of the typical MHA wagon is usually a hotchpotch of dings, marks and scratches, having been loaded and unloaded many times with mechanical grabs. Often the internal plating is dented from the inside, leading to the outer skin of red paint starting to peel, and rust quickly forming. This can be recreated with fine brushes and several layers of brown paint.
Start with the same fine 5/0 brush seen earlier, and gradually paint on lines of Humbrol No. 62 light brown onto the body, following prototype pictures for guidance. Alongside this, extra spots and damages can be painted at the same time in the light brown shade.
Step 19

Once dried, keep building up the layers of scratches with darker shades of brown, going to Humbrol No’s. 186, 113 and 133 respectively, the darkest brown representing the epicentre of any rust outbreak. Additional markings of dark brown and grey can be added as required to match up your wagon exterior to photographs found online.
Step 20

These damages can also be applied over the newly-painted graffiti to make it appear as if it has been present on the wagon for a while, and blended in to the overall finish.
Step 21

When it comes to graffiti, there are several main types, and alongside the mural was a few ‘tags’ scrawled in a single colour on the side and end of the wagon, which were again replicated with a fine 5/0 brush, carefully keeping an eye on the prototype picture, whilst painting on using a suitable colour from the Humbrol enamel range.
Weathering the underframe
Step 22

Up until now, all the attention has been on the body, so it’s finally time for the chassis to get a look-in. Soon after rebuilding and re-entry to service as MHAs, the wagons soon built up thick layers of track grime across their underframes, which can be replicated in miniature by painting on Phoenix Paint’s ‘Track Dirt’ or ‘Sleeper Grime’ brown shades as a base layer to the underframe.
Further colours were blended in too, with some rusty browns around the brake equipment and darker greys to represent oily deposits from around moving parts, observing prototype photos to judge where to place certain shades.
Step 23

On one of the wagons, the prototype being modelled had received a number of chalked and painted markings, which are not graffiti, but in fact markings made by rail workers as part of their daily role, particularly in engineering possessions. Often MHAs can be seen with related daubings to denote what load it’s carrying, the position within the rake of wagons, or even whether there’s a fault and the wagon shouldn’t be loaded. Here, this wagon had an asterisk and ‘RAIL’ marked on, alongside a large ‘E’, which were all painted on using a fine 5/0 brush. It’s a great way of adding extra individuality to your MHA wagon fleet.
Step 24

Finally on the underframe, Humbrol No. 27004 Metalcote Gunmetal is drybrushed onto the chassis to highlight some of the raised edges including the frame, brake lever and W-irons around the wheels. The whole wagon is then varnished, including the wagon interior, exterior body and chassis with a finishing coat of Railmatch Matt Varnish (No. 1409).
Wheels
Step 25

As supplied, the Accurascale wheels have a bright metallic finish, and this can be painted further to enhance the brake disc detail featured on one wheel of each wheelset. Both front and rear of each wheel face is painted in Humbrol No. 32 dark grey, and for the wheel with the brake disc, this is wiped away with a cotton bud to allow the grey paint to settle into the recesses in the etching.
Step 26

Here the difference can be seen between a painted wheelset on the left compared to the original on the right. The dark grey has also been painted carefully on the surrounding outer lip of the wheel with a fine brush, being careful to avoid getting any paint on the metal tread of the wheel. Any spillage can be wiped away with a cotton bud while still wet.
Modelling loads
The MHA ‘Coalfish’ have carried many varied loads over the years, so there’s a prototype for almost anything. Looking through most available photographs of the prototype commonly show either fresh ballast or spoil (waste ballast/dirt/rubbish from engineering possessions) being frequent loads, as well as sand being another common commodity inside an MHA.
Even modelling unloaded, empty wagons can be rewarding, and on a design like the MHA that features no exit doors with which to sweep out a wagon, they are rarely truly ‘empty’, with small amounts of their previous load being visible inside, making for a fun model.
The ‘Empty’ Wagon
Step 27

Two of the wagons were to be modelled with evidence of fresh ballast being left inside the edges of the interior, frequently seen as a result of mechanical grabbers being unable to get every last stone out from the box body. Attwood Aggregates and many other suppliers produce ballast chippings of varying size and colour, so there’s plenty of options on replicating something you’ve seen in real life or a photograph.
Step 28

Start by applying small amounts of glue (in this case Microscale Kristal Klear strong PVA) to the very edges of the wagon interior, and in lines across the wagon, to mimic where bits of ballast may lay having just missed the last bucket scoops of a grabber.
Step 29

Ballast is laid onto the wet glue, with the wagon tilted around to get the loose ballast to stick, with any excess tipped back into the bag for future usage.
Modelling a Sand Load
Step 30

Sand loads can take a variety of shapes and forms, often loaded by digger, they can either be heaped or have a flat top, having been ‘patted’ down by the bucket, so the best advice is to again follow prototype pictures and model something that you’re happy with. Here, a Peco moulded coal load has been filed down to smooth the top, and mounted on top of some foamboard, cut to shape and fitted inside the wagon.
Step 31

The foamboard was push-fitted into the wagon, and the Peco load secured on top with PVA glue, it’s strongly recommended to avoid using any solvent-based glue as it could damage and warp the plastic wagon body. Use the PVA glue to seal in the edges of the load and create a uniform shape onto which your ‘sand’ can then be applied later.
Step 32

The plastic load former is then painted entirely in the PVA glue, ready for application of the ‘sand’.

Step 34

The ‘sand’ itself is ‘Scenic Dust’ from Attwood Aggregates, very fine powder that has the consistency of talc, but available in a sand colour. This is shaken liberally over the wet glue on the plastic load former, and the excess sprinkled back into the bucket for the future.
So, there you have it! We think that James's tips really bring out the best in our MHAs, and the results speak for themselves...


Feeling inspired? Grab some modelling materials and then pick up some of our MHA packs right here while stocks last. Remember, they're just £74.95 per triple pack and 10% off when you buy two packs or more with free UK postage and packaging.