We know having to return an item is never ideal, so we are here to make the process as easy as possible. By ordering from our website, you agree this policy applies to all customers in all geographies for all orders submitted.
Returning items - Up to 30 days from delivery
If your order arrives damaged, arrives too late, is faulty or not working as expected, or you just changed your mind, here are your options:
In accordance with the Consumer Contracts Regulations (2013) and
Consumer Rights Act (2015), as your item was bought online, you have the following rights:
(1) You have a cancellation period that starts when you place the
order, and ends 14 days from the date you receive the goods
(2) You then have 14 days from that date to return the goods under
law, which accurascale extends to 30 days from receipt of the goods at
no cost to you.
In this case, you need to tell us the goods are being returned by using the Returns facility on our website and obtaining a Return Number, within 14 days of delivery, and return the goods to us within 30 days of opening that process. Any parcels containing items not registered and approved for return via our online returns facility will be returned to the sender unopened.
Items being returned must be:
(a) In original condition
(b) In the original packaging
(c) Not modified in any way
accurascale will cover the return postage for items that are damaged
in transit, or faulty on receipt. You can choose from a range of courier
options, including:
DPD and EVRI in the UK
Deutsche Post and DPD in Germany
Chronopost in France
Canada Post in Canada
DHL for Rest of World
Alternatively, you can choose to use your own postage option, which will we reimburse you for in the form of store credit upon submission of a copy of the receipt.
You do not need a reason to return any item under this category but there is a charge to cover the shipping cost if the item being returned is not damaged or faulty.
After this 30 day period from delivery elapses, you can no longer return goods unless they are damaged or faulty.
Returning items - from 30 days to 180 days from delivery
If your order is is Faulty or Not Working as expected after 30 days and before 180 days from receipt, here are your options:
(a) We will refund you to the original payment method
(b) We will exchange the item for the same item (if available)
(c) We will exchange or part exchange the item for any other in stock item on sale, or a different variant of the same item
(d) We will award an accurascale Gift card with an equivalent amount
(e) We will award you to a discount code which you can apply to a future purchase at the time of ordering (we offer a 10% value bonus on this option, so if we will refund you £100, you get a discount valued at £110)
In this case, you need to tell us the goods are being returned, by using the Returns facility on our website and getting a Return Number, within 180 days, and return the goods to us within 14 days of opening that return case. Any parcels containing items not registered and approved for return via our online returns facility will be returned to the sender unopened.
The items returned must be:
(a) In original condition
(b) In the original packaging
(c) Not modified in any way
accurascale will cover the return postage for items that are damaged
in transit, or faulty on receipt.
Alternatively, you can choose to use your own postage option, which will we reimburse you for in the form of store credit upon submission of a copy of the receipt.
Options available to you in this period to resolve the issue include:
(a) We will refund you to the original payment method
(b) We will exchange the item for the same item (if available)
(c) We will exchange or part exchange the item for any other in stock item on sale, or a different variant of the same item
(d) We will award an accurascale Gift card with an equivalent amount
(e) We will award you to a discount code which you can apply to a future purchase at the time of ordering (we offer a 10% value bonus on this option, so if we will refund you £100, you get a discount valued at £110)
From Purchase - the accurascale lifetime warranty
After the 180-day period has elapsed (approximately 6 months)
you are covered by the accurascale ‘lifetime warranty’ which provides for the original purchaser of the item, from accurascale.com or an authorised stockist, for a model that is deficient in material or workmanship when used normally from the date of delivery, we will provide one of the following options as sole recourse:
(a) A replacement model (the same model if available, otherwise a
replacement from the same or similar range)
or...
(b) accurascale will repair the product using new or previously used parts
or...
(c) accurascale will provide free spare parts for the user, where such a failed part is readily replaceable by the user and they are happy to do so
accurascale will cover the return postage for items that are damaged in transit, or faulty on receipt.
Alternatively, you can choose to use your own postage option, which will we reimburse you for in the form of store credit upon submission of a copy of the receipt.
In this case, you need to tell us the goods are being returned, by using the Returns facility on our website and getting a Return Number, and return the goods to us within 14 days of opening that return case. Any parcels containing items not registered and approved for return via our online returns facility will be returned to the sender unopened.


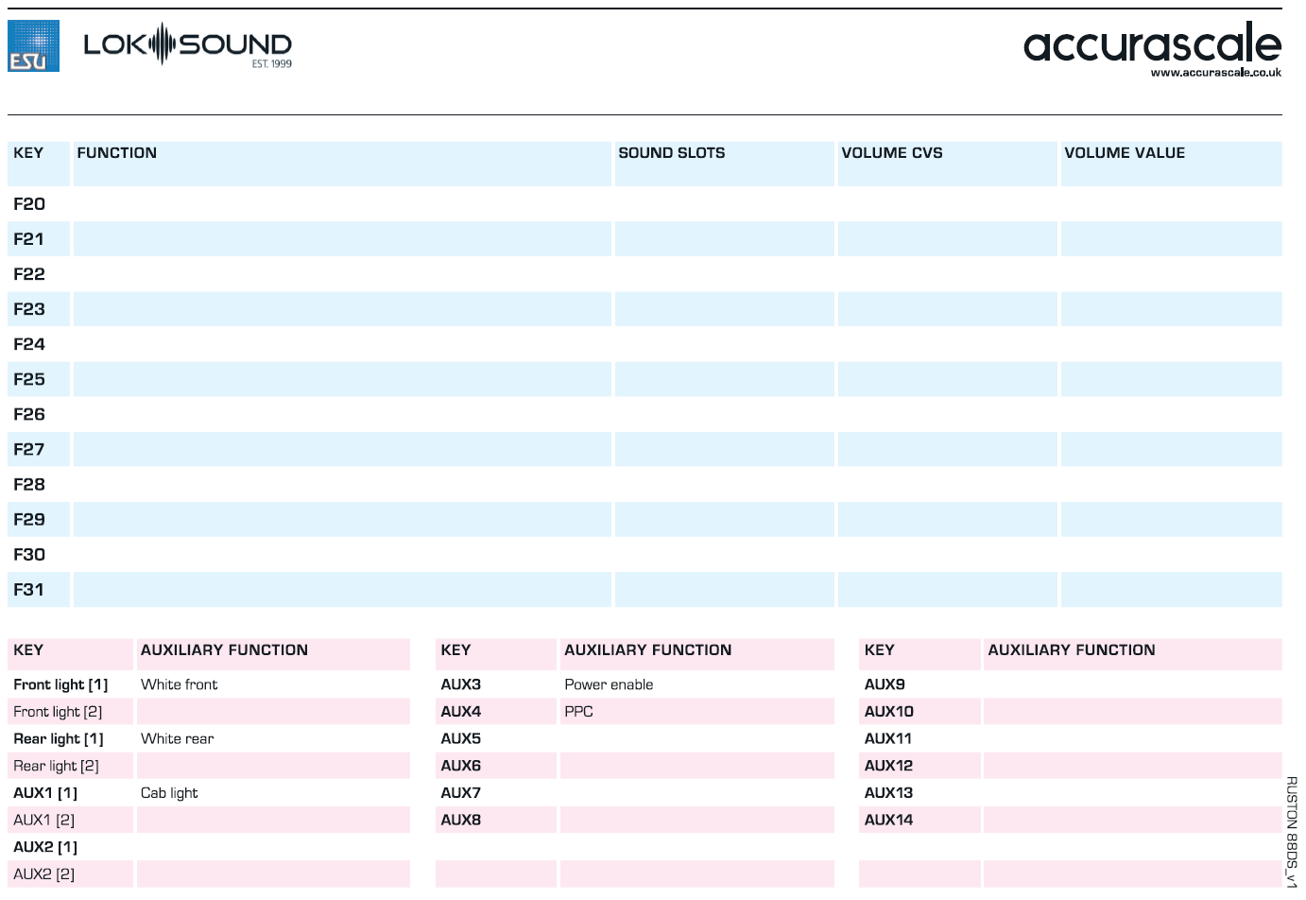
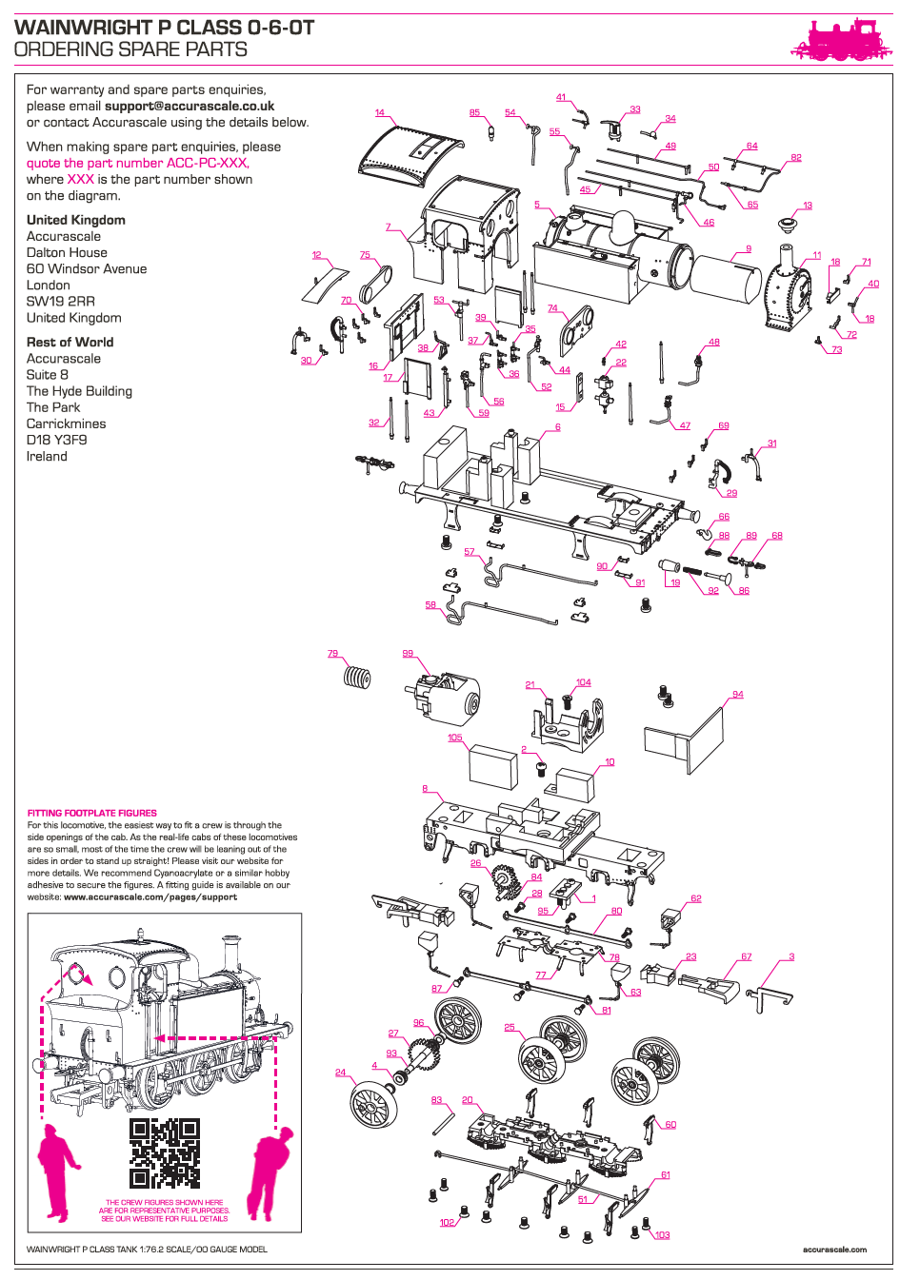
.png)


.png)