

Welcome to another of our “Let’s Get Involved” series of how-to modelling guides, featuring techniques to take our models to the next level. Today, it’s the Accurascale APCM ‘PCV’ Cemflo wagons in the spotlight, as David Wager shows how to recreate the distinctive, work-worn finish of these hard-used cement carriers. Over to you, David!
The Prototype
Getting photographs of wagons as an aid to weathering is not always easy, especially colour photographs which make the task somewhat easier. Good close up pictures of Cemflos for the period, mid to late 60’s for example are rare. This is the period I was modelling, and it took extensive research to gather enough information to be able to accurately represent Cemflos which had been in service for between 4 and 6 years.
It helped to look at more recent photographs of later period wagons, PCA’s for example that had been subjected to the similar duties for the same period of time. Enough information was eventually cobbled together, and hopefully the weathering applied correctly depicts the Cemflos subjected to deterioration and gathering of spillages over the period modelled.

Weathering was started on two Cemflos by applying base coats of Life Colour Tensocrom colours and panel line washes. These were taken along to one of Pendon Museum weathering courses, where Tim Shackleton and Mick Bonwick tutored us on new, (to me anyway) weathering techniques that could be applied to the Cemflos. Quite surprisingly a set of oil paints came out, but it worked.
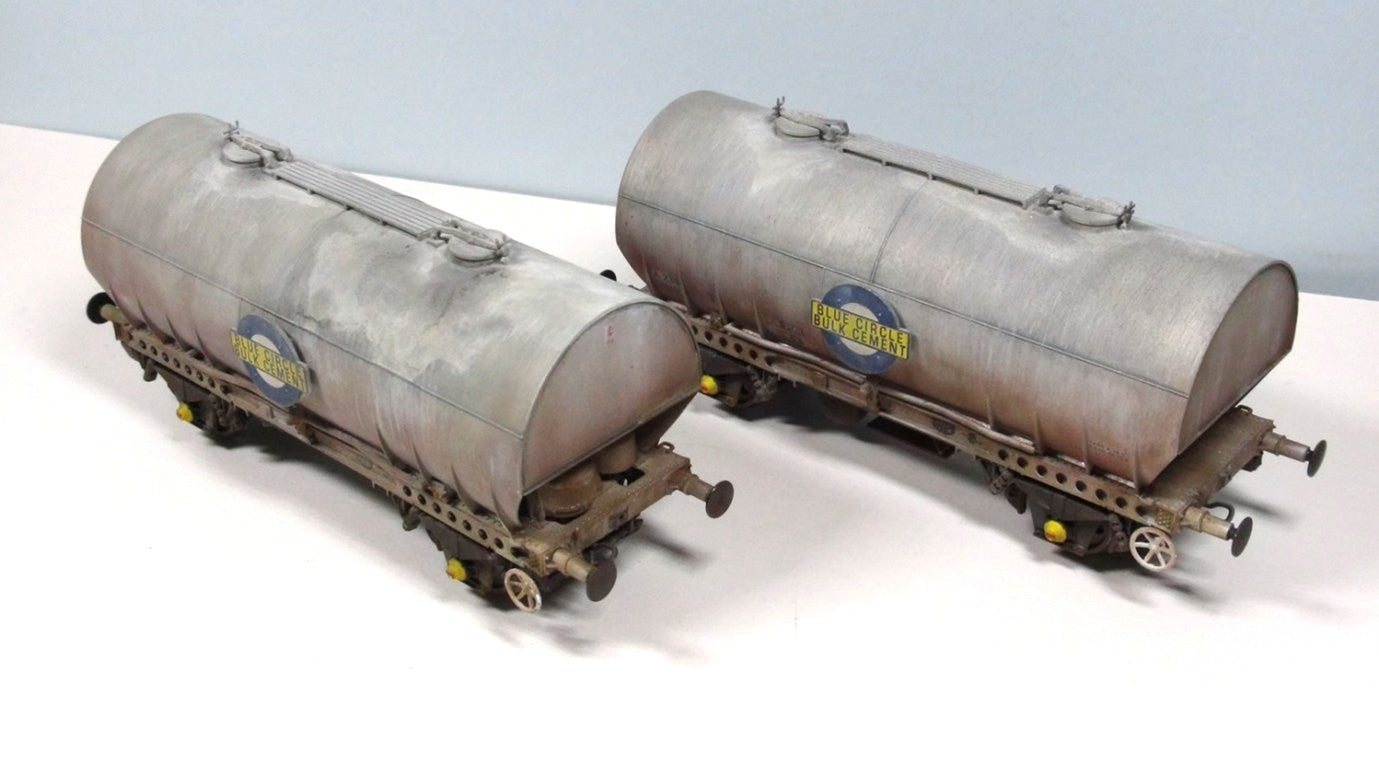
This, together with some additional experimentation back home resulted in the two weathered wagons as below. The weathering represents general corrosion of the aluminium tank, repeated cement spillage, staining from hatch lubrication, and an underframe suffering an accumulation of dirt, but with relatively light corrosion.

Compare the pristine:

There was another 10 wagons to weather. These would also show spillage, some corrosion and accumulated dirt, but to a lesser extent than the first 2. A couple of them would be fairly new into operation to give some variety in the rake. Importantly the same basic colour palette would be used.
The Process:

Testors Dullcote lacquer is sprayed over the tank including the sides and ends, (outdoors or use extract booth as toxic) to provide a matt coat prior to weathering
Apply panel lines using MIG Blue Black A.MIG-1617 wash using a rigger brush. This is optional and will give a faint shadow under subsequent layers if desired. It is especially useful on the tank ends where there are recesses.
When dry (overnight), brush on Life Colour Tensocrom White Oxide TSC 212 wash, diluted with acrylic thinners 50:50 over the tank body and ends, making sure it spreads (not evenly but without blotches). Use thinners to clean the numbers etc.
Tensocrom is then airbrushed onto the tanks. First Dust Type ‘1’ 1706 again diluted. Turn the air pressure right down to get up close. Apply randomly over the tank (a little on the ends perhaps), and filling in gaps around the decals. Finally Dust type ‘2’ 1705 around the hatches. These last two applications are again optional but do give some tonal variation (and they were included in the Life Colour Tensocrom set)

Moving to the underframe:
Life Colour Frame Dirt UA719 paint is airbrushed over the underside and then the sides (below the tank), and finally in the ends (a light dusting)

Colour variation of the tank
Now come to oil paints (method courtesy of Tim Shackleton), which sounds a bit scary, but it can be worked and easily removed with white spirit so there is plenty of time to adjust. I used the colours Paynes Grey 32 + Naples Yellow 29 + Titanium White 40, from the Windsor & Newton range.
 The Paynes grey is too dark so it was made paler with some white and a touch of yellow. The colours are spotted onto the tank sides with different patterns to give variability. Load to a piece of card so that excess oil is soaked away.
 The colours are then mixed with, first a dry brush and then a damp brush, with final vertical strokes. The amount of paint applied will give variability and determine how much of the previous base colours are retained.
The same is done on some of the ends to a lesser extent.
 Additional dabs of paint (white and black) are added for localised variation and to give some streaking effects. Use dry brushing method for this.
It’s there but subtle, which is how it needs to be.
 Next comes the airbrushing stage...

A mix of the Life Colour Acrylic paint. 2 parts Rail Weathering Frame Dirt 1705 + 1 part Sleeper Grime UA 721 + 1 part Track Dirt UA 720.
This is applied to the lower part of the tank and the upper part of the underframe, plus frame ends. Applied was generally light and variable from tank to tank, but if too heavy then it is manipulated with thinners which gives a secondary effect. Areas can also be treated with thinner and a comb brush to generate some streaking. As acrylic is used it needs to be done soon after applying paint. The lower part of the tank will have more treatment but the weathering base layer is now applied for now.
 Now we come to weathering involving the spillage around the hatches and the blending of tank sides:
 h) MIG Deep Grey A.MIG-1602 wash is applied to the workings around the hatches and the platform. Spread and thin with white spirit:


i) Then Life Colour liquid pigment, LPW 20 Dried Salt 1602 is applied to the areas where the spillages will extend to. This was done in 3 layers with partial drying each time and some spreading to avoid drips and blotches.


After the last coat, and when the surface was tacky Life Colour N Europe Dust PG 111 pigment was patched on top of the areas selected

Another 2 coats of dried salt added (this can be done until the desired effect is reached)

Again pigments are added to a tacky surface, this time using the N Europe Dust and in addition Abteilung 502 Alkaline Dust ABTP054 pigment to give some tonal variation

To get a bit of depth to the spillage, the tanks are spayed with Testors Dullcote and when tacky N Europe Dust is tapped from a brush onto the higher part of the spillages and around the platform and hatches. This is then adjusted with a brush to even out any clumps. Thanks to Mick Bonwick for showing me this technique at Pendon. This can be repeated depending on the intensity required.

At this stage Ashes Grey Abteilung 502 ABTP035 pigment can be added around the spills with reference to the prototype photographs.
It is blended in carefully with the N Europe Dust. The latter sequences i) to l) can be repeated as often as necessary to get the desired effect with new areas of spillage being revealed.

To give fresh areas of spill, and white patches where the upper dirty layers have peeled off, the LC Dried Salt is applied with a small brush a number of times to get the right strength and blended in (when dry) with the N Europe Dust

The interface between the upper and lower parts of the tank need to be blended. For this use the Abteilung 502 Urban Industry Dirt ABTP039 pigment which is a close match to the air brush mix previously applied to the lower tank area. This is worked upwards and N Europe Dust worked downwards to remove any obvious division between areas

Now we come to the final stage weathering, especially the lower parts of the tank and the underframe
The components around the lower part of the tank are highlighted by applying MIG PLW Blue Black A.MIG-1617 wash. It is also applied for a second time to some of the hatch closure parts and to strengthen some of the darker spillage areas.

The underframe and ends are then treated with pigments; Abteilung Dark Mud ABPT033, Abteilung Track Rust ABPT414, AK Interactive Burnt Umber AK143 and Life Colour N Europe Dust.
By checking the prototype photos, the extent of dirt / corrosion / overspill can be replicated. The Dark Mud is particularly good when applied to brake pads. The combination of Burnt Umber and N Europe Dust around the discharge chute is used to give a dirty cement effect.


Next, assuming maintenance has taken place, Life Colour Leaking and Stains Exhaust oil effect UA261 is applied to some of the lubricated parts, and AK Interactive Engine Oil AK084 around some of the axle boxes.


The buffers need to be toned down. This is done with a Burnt Umber & N Europe Dust combination, followed by spotting the contact points with Leaking and Stains Exhaust oil effect. The gloss can be reduced a little with pigments, once dry.


Here are the 12 Cemflos in weathered condition. You may notice that two, near the front, have had less service and therefore have lighter weathering, but from exactly the same palette.


We hope that David's excellent weathering guide will inspire you to tackle your own Accurascale PCV 'Cemflo' wagons - and if you missed our first run, don't worry, you can pre-order yours from our next run, due to arrive in Q1 2027!
Pre-order your Cemflo wagons today with no deposit down!


